So, SVG has this stroke-miterlimit presentation attribute. You’ve probably seen it when exporting an SVG from a graphic editor program, or perhaps you find out you could remove it without noticing any change to the visual appearance.
After a good amount of research, one of the first things I discovered is that the attribute works alongside stroke-linejoin, and I’ll show you how as well as a bunch of other things I learned about this interesting (and possibly overlooked) SVG attribute.
TLDR;
stroke-miterlimit depends on stroke-linejoin: if we use round or bevel for joins, then there’s no need to declare stroke-miterlimit. But if we use miter instead, we can still delete it and maybe the default value will be enough. Beware that many graphic software editors will add this attribute even when is not necessary.
What is stroke-linejoin?
I know, we’re actually here to talk about stroke-miterlimit, but I want to start with stroke-linejoin because of how tightly they work together. This is the definition for stroke-linejoin pulled straight from the SVG Working Group (SVGWG):
stroke-linejoinspecifies the shape to be used at the corners of paths or basic shapes when they are stroked.
This means we can define how the corner looks when two lines meet at a point. And this attribute accepts five possible values, though two of them have no browser implementation and are identified by the spec as at risk of being dropped. So, I’ll briefly present the three supported values the attribute accepts.
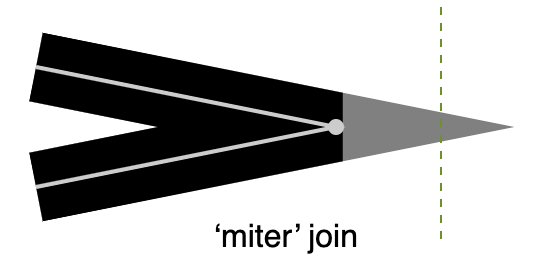
miter is the default value and it just so happens to be the most important one of the three we’re looking at. If we don’t explicitly declare stroke-linejoin in the SVG code, then miter is used to shape the corner of a path. We know a join is set to miter when both edges meet at a sharp angle.
But we can also choose round which softens the edges with — you guessed it — rounded corners.
The bevel value, meanwhile, produces a flat edge that sort of looks like a cropped corner.
What is stroke-miterlimit?
OK, now that we know what stroke-linejoin is, let’s get back to the topic at hand and pick apart the definition of stroke-miterlimit from the book Using SVG with CSS3 and HTML5:
[…] on really tight corners, you have to extend the stroke for quite a distance, before the two edges meet. For that reason, there is a secondary property:
stroke-miterlimit. It defines how far you can extend the point when creating a miter corner.
In other words, stroke-miterlimit sets how far the stroke of the edges goes before they can meet at a point. And only when the stroke-linejoin is miter.

So, the stroke-miterlimit value can be any positive integer, where 4 is the default value. The higher the value, the further the corner shape is allowed to go.
How they work together
You probably have a good conceptual understanding now of how stroke-linejoin and stroke-miterlimit work together. But depending on the stroke-miterlimit value, you might get some seemingly quirky results.
Case in point: if stroke-linejoin is set to miter, it can actually wind up looking like the bevel value instead when the miter limit is too low. Here’s the spec again to help us understand why:
If the miter length divided by the stroke width exceeds the
stroke-miterlimitthen [themitervalue] is converted to a bevel.
So, mathematically we could say that this:
[miter length] / [stroke width] > [stroke-miterlimit] = miter
[miter length] / [stroke width] < [stroke-miterlimit] = bevel
That makes sense, right? If the miter is unable to exceed the width of the stroke, then it ought to be a flat edge. Otherwise, the miter can grow and form a point.
Sometimes seeing is believing, so here’s Ana Tudor with a wonderful demo showing how the stroke-miterlimit value affects an SVG’s stroke-linejoin:
Setting miter limits in design apps
Did you know that miter joins and limits are available in many of the design apps we use in our everyday work? Here’s where to find them in Illustrator, Figma, and Inkscape.
Setting miter limits in Adobe Illustrator
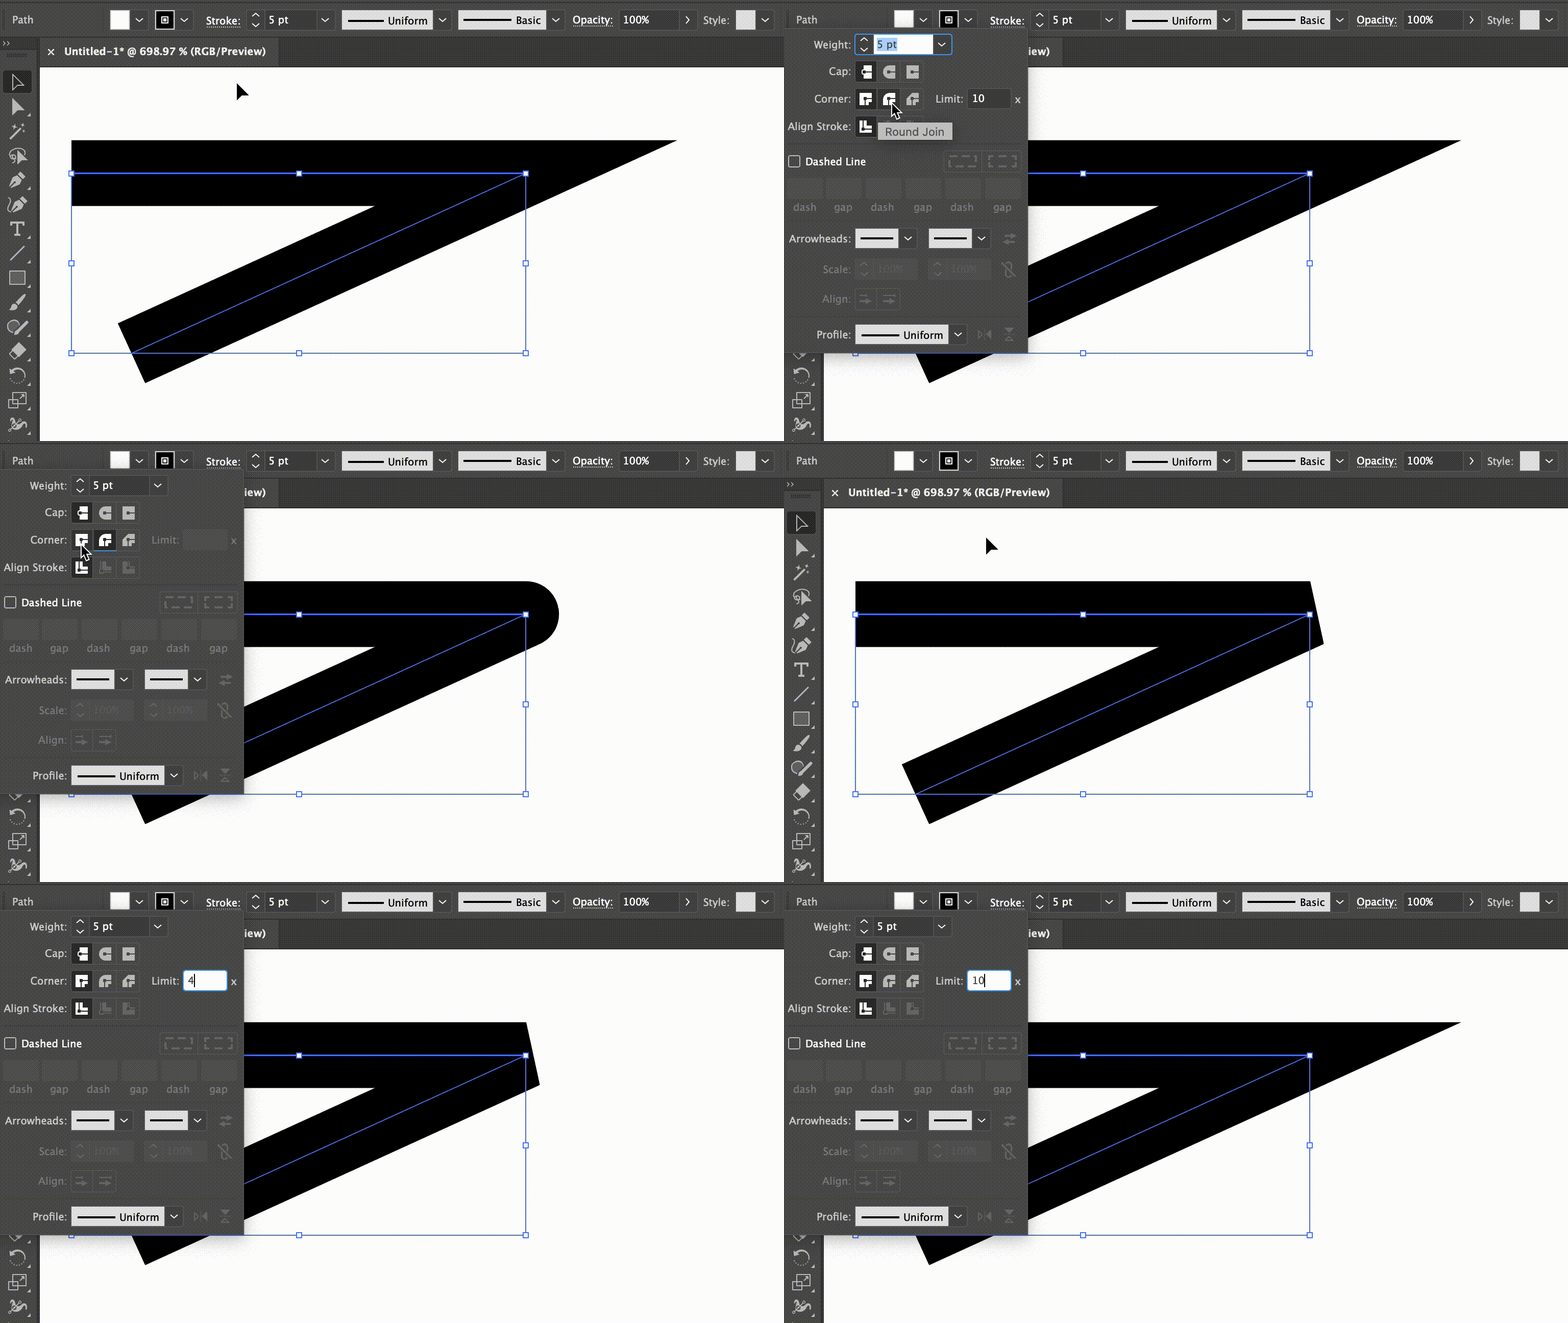
Illustrator has a way to modify the miter value when configuring a path’s stroke. You can find it in the “Stroke” settings on a path. Notice how — true to the spec — we are only able to set a value for the “Limit” when the path’s “Corner” is set to “Miter Join”.

One nuance is that Illustrator has a default miter limit of 10 rather than the default 4. I’ve noticed this every time I export the SVG file or copy and paste the resulting SVG code. That could be confusing when you open up the code because even if you do not change the miter limit value, Illustrator adds stroke-miterlimit="10" where you might expect 4 or perhaps no stroke-miterlimit at all.
And that’s true even if we choose a different stroke-linejoin value other than “Miter Join”. Here is the code I got when exporting an SVG with stroke-linejoin="round".
<svg viewBox="0 0 16 10"><path stroke-width="2" stroke-linejoin="round" stroke-miterlimit="10" d="M0 1h15.8S4.8 5.5 2 9.5" fill="none" stroke="#000"/></svg>
The stroke-miterlimit shouldn’t be there as it only works with stroke-linejoin="miter". Here are a couple of workarounds for that:
- Set the “Limit” value to 4, as it is the default in SVG and is the only value that doesn’t appear in the code.
- Use the “Export As” or “Export for Screen” options instead of “Save As” or copy-pasting the vectors directly.
If you’d like to see that fixed, join me and upvote the request to make it happen.
Setting miter limits in Figma
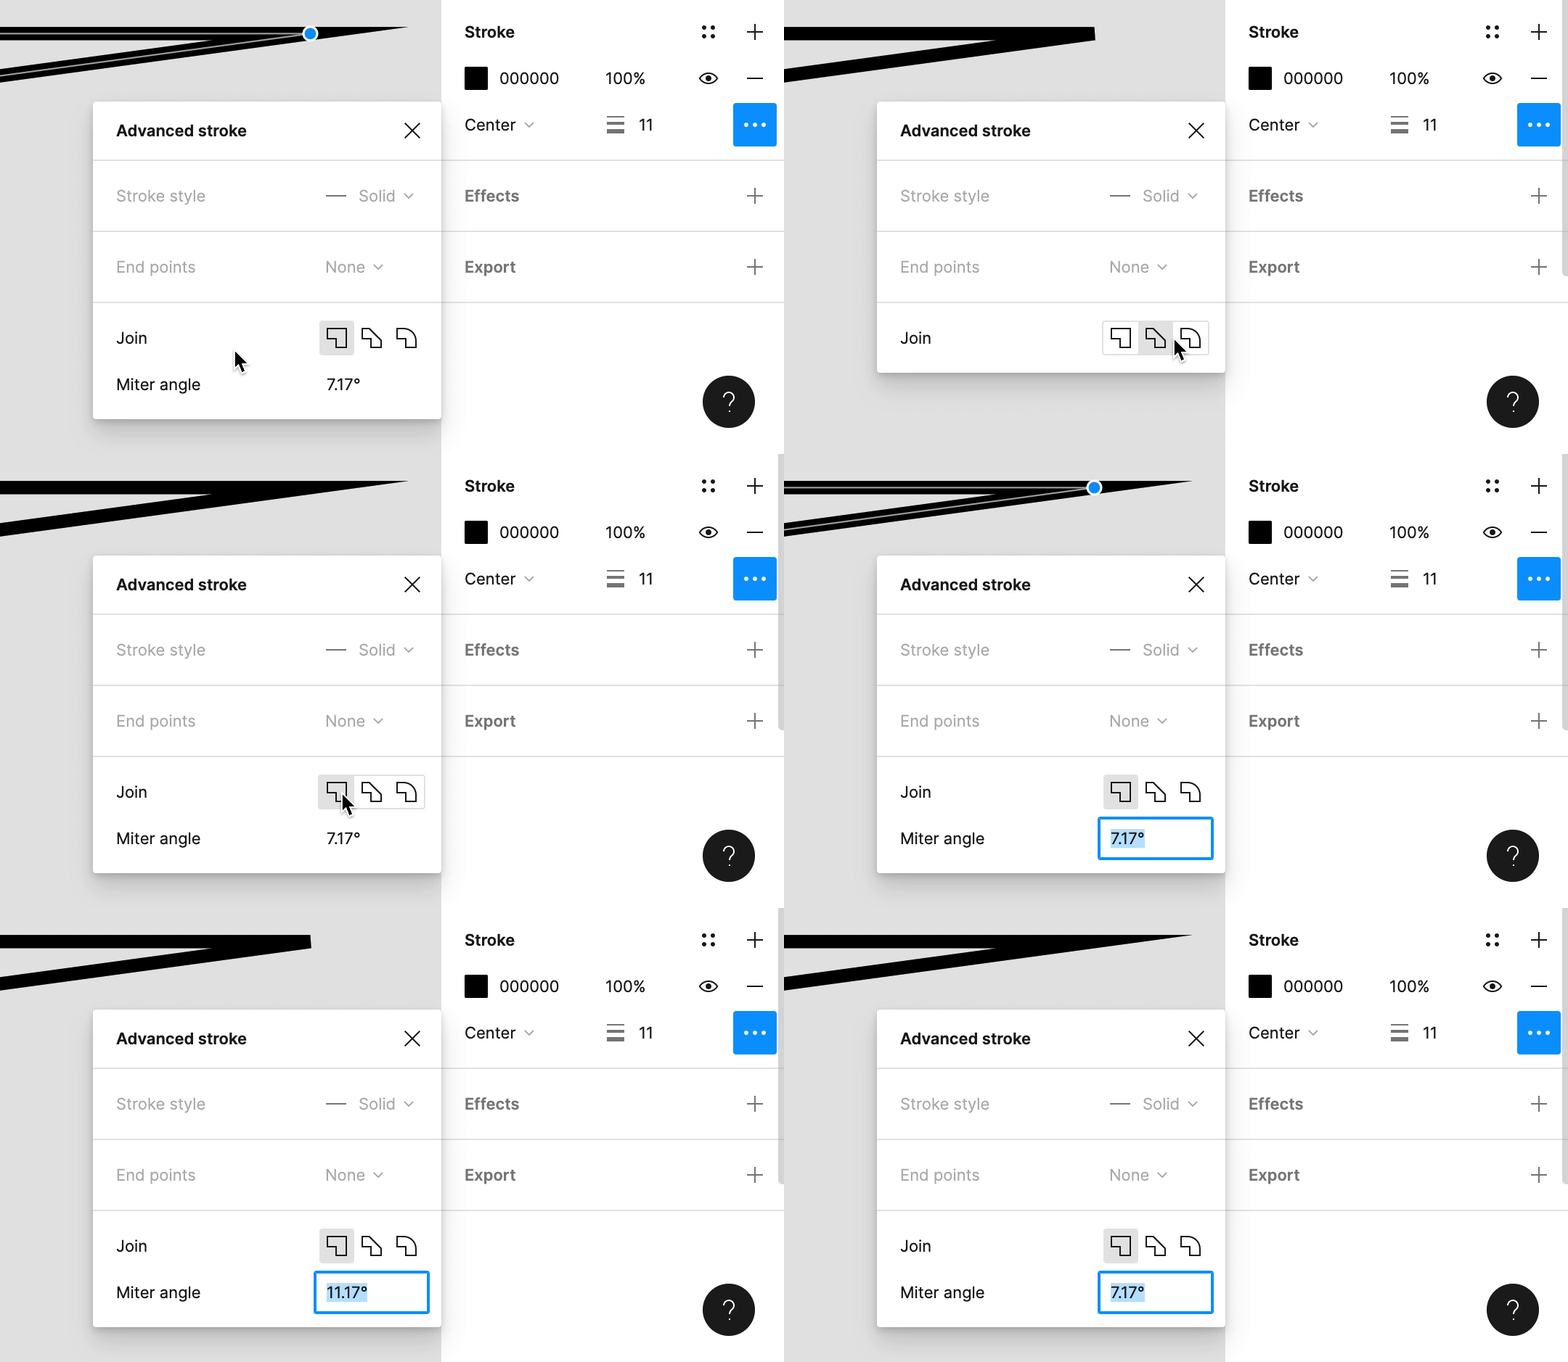
Miter joins and limits are slightly different in Figma. When we click the node of an angle on a shape, under the three dots of the Stroke section, we can find a place to set the join of a corner. The option “Miter angle” appears by default, but only when the join is set to miter:

This part works is similar to Illustrator except for how Figma allows us to set the miter angle in degree units instead of decimal values. There are some other specific nuances to point out:
- The angle is 7.17° by default and there is no way to set a lower value. When exporting the SVG, that value is becomes
stroke-miterlimit='16' in the markup, which is different from both the SVG spec and the Illustrator default. - The max value is 180°, and when drawing with this option, the join is automatically switched to bevel.
- When exporting with bevel join, the
stroke-miterlimitis there in the code, but it keeps the value that was set when the miter angle was last active (Illustrator does the same thing). - When exporting the SVG with a round join, the path is expanded and we no longer have a stroke, but a path with a fill color.
I was unable to find a way to avoid the extra code that ends up in the exported SVG when stroke-miterlimit is unneeded.
Setting miter limits in Inkscape
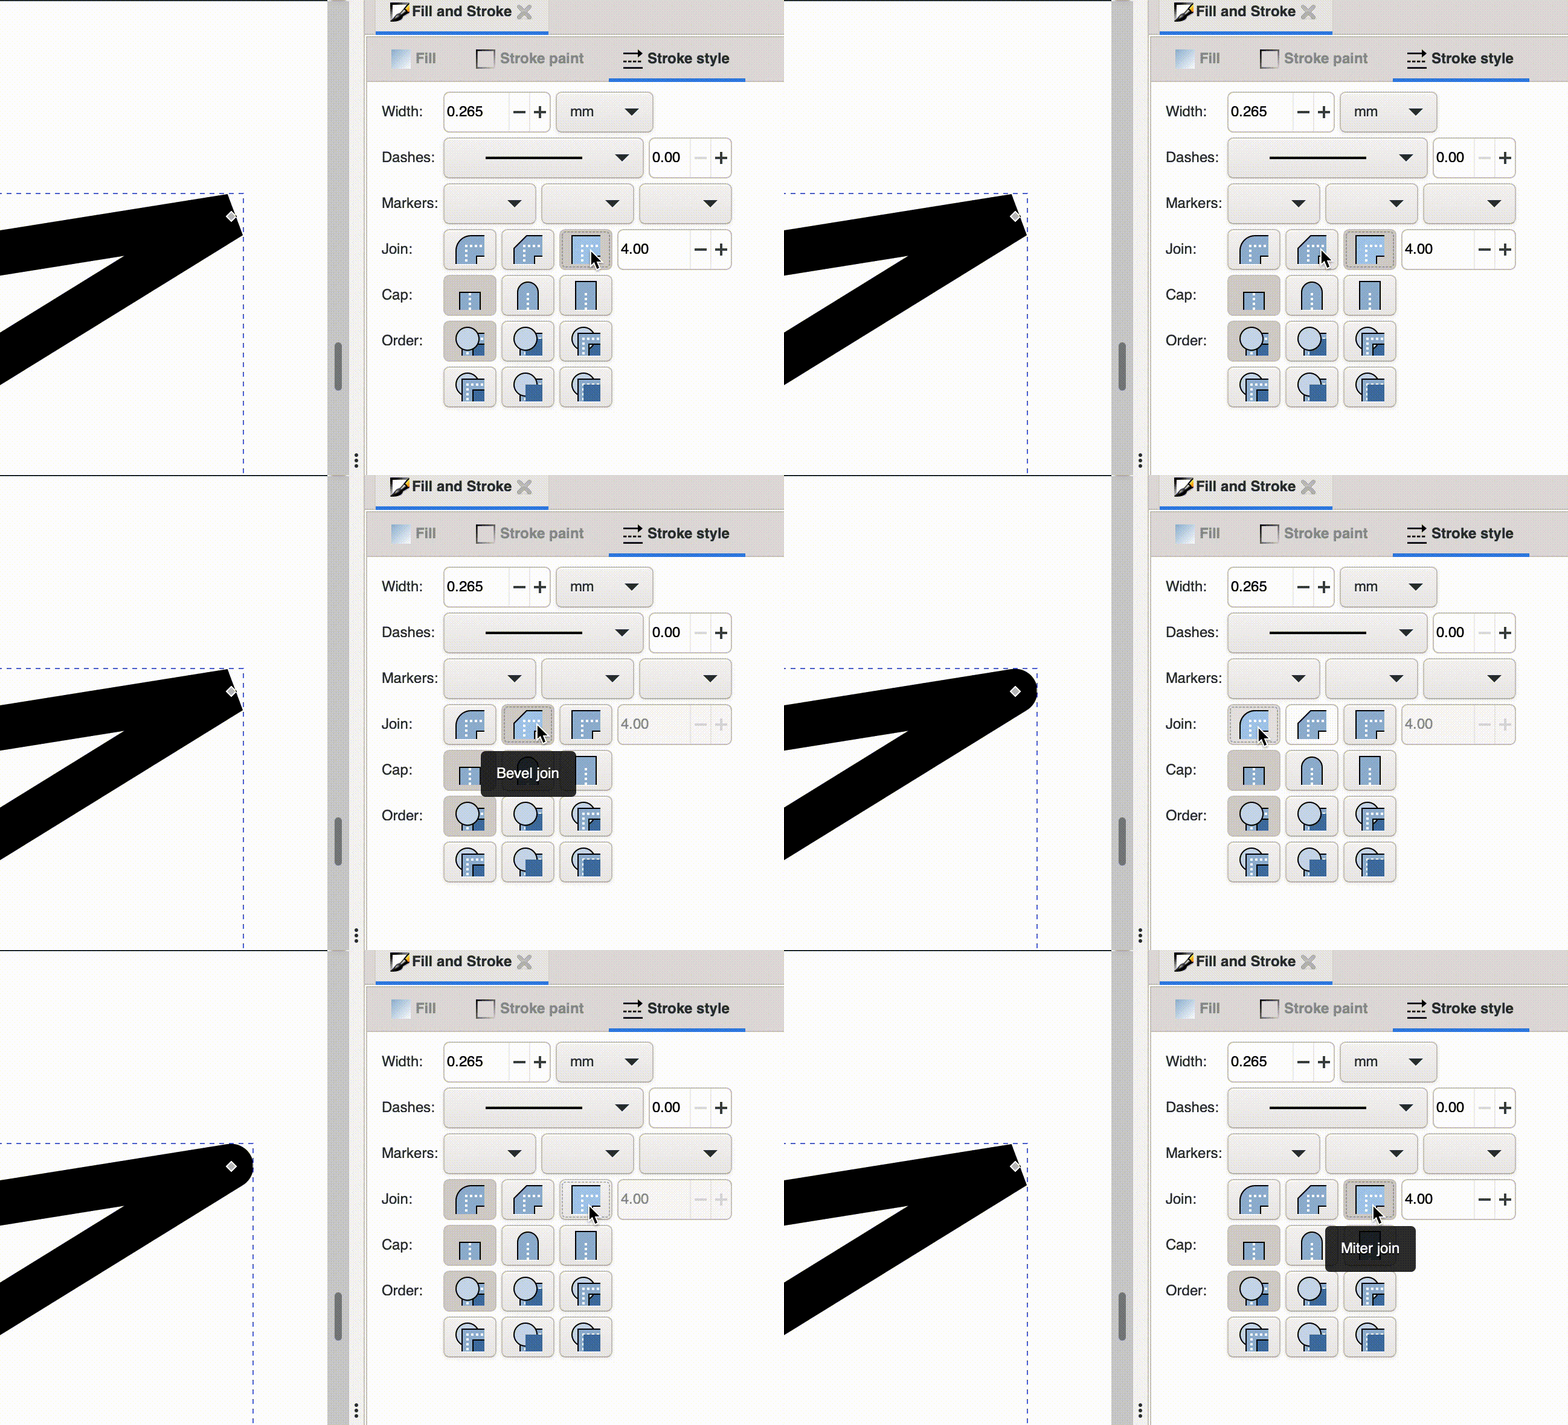
Inkscape works exactly the way I’d expect a design app to manage miter joins and limits. When selecting a a miter join, the default value is 4, exactly what it is in the spec. Better yet, stroke-miterlimit is excluded from the exported SVG code when it is the default value!

Still, if we export any path with bevel or round after the limit was modified, the stroke-miterlimit will be back in the code, unless we keep the 4 units of the default in the Limit box. Same trick as Illustrator.
These examples will work nicely if we choose the Save As → Optimized SVG option. Inkscape is free and open source and, at the end of the day, has the neatest code as far as stroke-miterlimit goes and the many options to optimize the code for exporting.
But if you are more familiar with Illustrator (like I am), there is a workaround to keep in mind. Figma, because of the degree units and the expansion of the strokes, feels like the more distant from the specs and expected behavior.
Wrapping up
And that’s what I learned about SVG’s stroke-miterlimit attribute. It’s another one of those easy-to-overlook things we might find ourselves blindly cutting out, particularly when optimizing an SVG file. So, now when you find yourself setting stroke-miterlimit you’ll know what it does, how it works alongside stroke-linejoin, and why the heck you might get a beveled join when setting a miter limit value.
This article was first published on CSS-Tricks. Thanks to the edits of Geoff Graham ♥
